
As some of you may know, I got engaged just over a month ago. I have decided to take on quite a few DIY projects since I have just about a year left until the wedding (April 2011), I love doing paper crafts and I want to save as much money as possible. That said, some of my blog posts on here will also be mini tutorials on how to make some of the things I am making.
It's also worth mentioning that our colors are red, black and white, so most things will be in those colors. Of course if you would want to make any of these things for yourself, you could make them in any color your heart desires. For the belly band embellishment, I used my Cuttlebug to emboss a wedding themed image. It would be easy enough to customize this portion for your own liking as well.
First up: Invitations! My plan for the invitations posts are to do them in parts, probably 3. This will be part 1 and will include instructions/pictures for how I cut all parts that are paper and assembled the belly band. Since this is as far as I've gotten thus far, this is as far as this blog post will go. Next up will be inserts, which will include all things related to the inserts (RSVP card, reception card, etc.). The third part will be a "final" blog putting all the sections together to make it easier to follow along should you decide to undertake the project yourself.
My disclaimer is that I don't really have a time schedule for these parts, so parts 1 and 2 could be a month or more apart, but parts 2 and 3 could be a few weeks apart.
And now on to the preparing the invitation!
Supplies (will make 150 total invitations that are 5x7"):
Black cardstock (8.5x11") - 88 sheets total - 75 sheets for invitation background - 13 sheets for belly band background
White cardstock (8.5x11") - 45 sheets total - 38 sheets for text portion of invitation - 7 sheets for belly band middle
Red satin ribbon (5/8" thickness) - 113 feet total
Black printer ink
Scotch tape
Cuttlebug
Wedding themed folders for Cuttlebug
Adhesive of your choice - I used a tape style glue runner
Paper cutter - or other method to cut the paper
Step 1 - Invitation background:
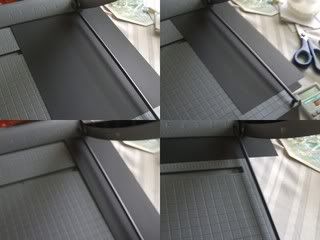
Cut the black cardstock into 5x7 rectangles. Each 8.5x11 piece of cardstock will make 2 5x7 rectangles. To do this, I trimmed 1 inch off to make the paper 8.5x10. I then turned the paper and trimmed 1.5 inches off to make it 7x10. This made it easier to cut it in half and make two 5x7 rectangles. I repeated this process with 75 sheets of black cardstock.
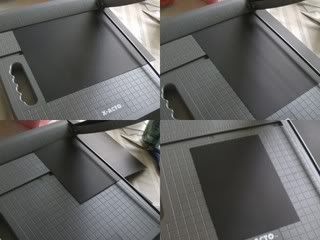
Step 2 - Text portion:
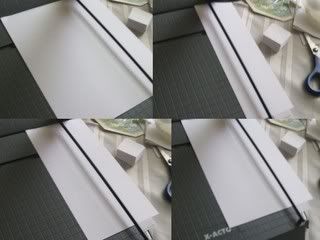
Cut the white cardstock into 4x5.5 rectangles. Each 8.5x11 piece of cardstock will make 4 of these. I first trimmed 1/2 inch off to make the paper 8x11. I then cut the paper in half to make two sections that were 4x11. I turned the paper and made another cut at 5.5 inches to make two sections that were 4x5.5. I did the same thing for the other 4x11 section and repeated the process for 38 sheets of white cardstock.

Step 3 - Invitation assembly
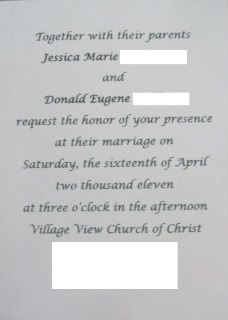
The 4x5.5 cards are now ready to be printed with your invitation information. Ours will look somewhat like this (for some reason it photgraphed somewhat gray, but rest assured it is bright white cardstock):
Step 4 - Belly band paper cutting:
My belly band will be a black square of cardstock with a slightly smaller white cardstock middle. The white cardstock part will help cover up the attachment of the ribbon.
I started by cutting the black cardstock into 2.25 inch squares. To do this, I cut 2.25x11 inch strips from a sheet of 8.5x11 cardstock. You will get 3 strips with a bit left over doing it this way. I then cut 2.25 inch squares from these strips. You will get 12-2.25 inch squares from each sheet of black cardstock. I repeated this process for 13 sheets, which gave me slightly more squares than I needed.
I then began cutting the white cardstock into 1.75 inch squares for the middle part of the belly band. To do this, I cut 1.75x11 inch strips from a sheet of 8.5x11 cardstock. You will get 4 strips with a bit left over. Then I cut each strip into 1.75 inch squares. You will get 24-1.75 inch squares from each sheet of white cardstock. I repeated this for 7 sheets of cardstock, which gave me several more squares than I needed, but 6 sheets wouldn't have been enough.
Step 5 - Belly band preparing for assembly:
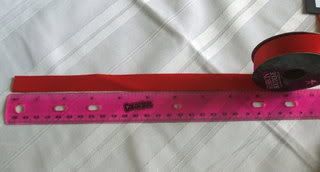
Cut a 9" piece of red satin ribbon (this will be cutting it close as far as wrapping around the invitation, so cut an extra 1/4 inch if you want).
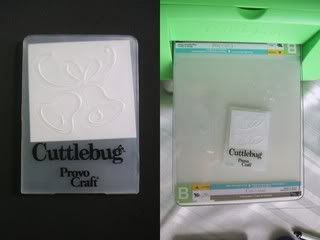
We chose the wedding bells folder and it came out looking like this:

Step 6: Belly band assembly
Assembling the belly bands is fairly easy. Lay the ribbon behind the invitation at the height you would like the belly band to be. Place the black square in the middle of the invitation and tape one side of the ribbon to it, far enough in so that the tape will be covered by the white square.

Repeat for the other side of the ribbon.
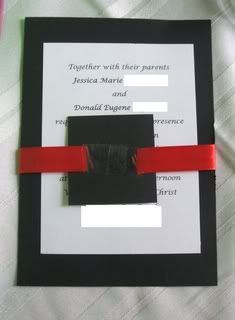
Put the adhesive of your choice on the back of the white, embossed square and place it in the middle of the black square, making sure it's straight and the tape from the ribbon is covered.
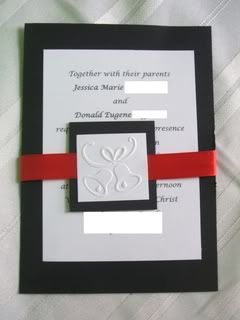
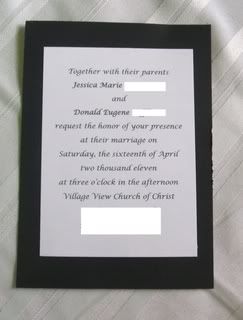
Finished product:
The finished invitation and belly band will look like this:
Additional information:
- The belly band will be a way for us to bring the red part of our color scheme into the picture. It will also keep all of our inserts together with the invitation since we did not opt for the pocket style invitations due to price and ability to DIY them.
- The invitations will require A7 size envelopes. These are a pretty standard envelope size so you should have no problems finding them. However, we are not using an inner envelope. If you want to use an inner envelope, you would need one that is at least 5.5x7.5.
- All supplies were purchased at Hobby Lobby for the following prices:
- Black cardstock - $4.99/50 sheets - 2 packs purchased with a few extra sheets - $9.98 total
- Red satin ribbon - $1.99/15 ft. roll - 8 rolls purchased with a few extra feet - $15.92 total
- White cardstock - already had plenty at home, no need to purchase more
- Tape style glue runner - $2.99 for 8.75 yards of adhesive in a refillable applicator - 2 purchased - $5.98 total
- Total for Part 1 = $33.95 with sales tax = $0.23 per invitation/belly band set
No comments:
Post a Comment